Difference between revisions of "Nordic Larp Wiki:Tutorial/Formatting"
en>Moxy (Wiki markup) |
|||
| (2 intermediate revisions by the same user not shown) | |||
| Line 1: | Line 1: | ||
{{pp-semi-indef}}{{pp-move-indef}} | {{pp-semi-indef}}{{pp-move-indef}} | ||
__NOEDITSECTION__ | __NOEDITSECTION__ | ||
| − | {{ | + | {{Nordic Larp Wiki:Tutorial/TabsHeader|This=3}} |
<div style="border: 2px solid #A3B1BF; padding: .5em 1em 1em 1em; border-top: none; background-color: #fff; color: #000;"> | <div style="border: 2px solid #A3B1BF; padding: .5em 1em 1em 1em; border-top: none; background-color: #fff; color: #000;"> | ||
{{TOCright}} | {{TOCright}} | ||
| − | '''Formatting a | + | '''Formatting a Nordic Larp Wiki article''' is different from writing in a standard [[word processor]] or in Nordic Larp Wiki's [[Special:Preferences#mw-prefsection-betafeatures|opt-in]], alternative editing environment, [[Wikipedia:Wikipedia:VisualEditor|VisualEditor]]. Instead of a strict [[WYSIWYG]] approach ("What You See Is What You Get"), Nordic Larp Wiki uses text codes called '''wiki tags''' to create particular elements of the page (e.g. headings). This [[lightweight markup language|markup language]] is known as '''[[Wiki markup|wikitext]]''' (or '''wiki-markup''') and is designed for ease of editing. See the [[WP:CHEAT|cheatsheet]] for a quick reference list of wikitext codes. Complicated articles may be best modeled on the layout of an existing article of appropriate structure and topic. |
==Basic markup== | ==Basic markup== | ||
| Line 31: | Line 31: | ||
|} | |} | ||
| − | On | + | On Nordic Larp Wiki, the names of an article's subject are written in '''bold''' when they are first mentioned in the article. For example, the article [[Elizabeth II]] begins: |
:'''Elizabeth II''' (Elizabeth Alexandra Mary, born 21 April 1926) is the constitutional monarch of 16 sovereign states, known as the Commonwealth realms, and their territories and dependencies, and head of the 53-member Commonwealth of Nations. ... | :'''Elizabeth II''' (Elizabeth Alexandra Mary, born 21 April 1926) is the constitutional monarch of 16 sovereign states, known as the Commonwealth realms, and their territories and dependencies, and head of the 53-member Commonwealth of Nations. ... | ||
| Line 71: | Line 71: | ||
==Using the editor toolbars == | ==Using the editor toolbars == | ||
===Wiki markup=== | ===Wiki markup=== | ||
| − | The | + | The Nordic Larp Wiki editor has two toolbars with buttons that help with the use of wikimarkup. For instance, if you want to type a text in bold, instead of manually typing the <code><nowiki>'''</nowiki></code> tags, you can just press the '''Bold''' button and then type the text in bold directly. |
If your toolbar looks like this: | If your toolbar looks like this: | ||
| Line 120: | Line 120: | ||
{{-}} | {{-}} | ||
===VisualEditor=== | ===VisualEditor=== | ||
| − | The '''[[Wikipedia:VisualEditor/User guide#Getting started: the VisualEditor toolbar|VisualEditor toolbar]]''' appears at the top of the screen when you begin editing. | + | The '''[[Wikipedia:Wikipedia:VisualEditor/User guide#Getting started: the VisualEditor toolbar|VisualEditor toolbar]]''' appears at the top of the screen when you begin editing. |
<div class="overflowbugx" style="overflow:auto; width: 90%;"> | <div class="overflowbugx" style="overflow:auto; width: 90%;"> | ||
[[File:VisualEditor toolbar-en.png|frameless|center|1200px|alt=Screenshot of the VisualEditor toolbar]]</div> | [[File:VisualEditor toolbar-en.png|frameless|center|1200px|alt=Screenshot of the VisualEditor toolbar]]</div> | ||
| Line 139: | Line 139: | ||
<br> | <br> | ||
{{-}} | {{-}} | ||
| − | <div style="float: right; background-color:#f5faff; color: #000; padding: .2em .6em; font-size: 100%; border: 1px solid #cedff2; margin-bottom:3px;">'''For more information, see [[Wikipedia:VisualEditor/User guide#Getting started: the VisualEditor toolbar|VisualEditor toolbar]] '''</div><br> | + | <div style="float: right; background-color:#f5faff; color: #000; padding: .2em .6em; font-size: 100%; border: 1px solid #cedff2; margin-bottom:3px;">'''For more information, see [[Wikipedia:Wikipedia:VisualEditor/User guide#Getting started: the VisualEditor toolbar|VisualEditor toolbar]] '''</div><br> |
{{clear}} | {{clear}} | ||
| − | <div style="float: right; background-color:#f5faff; color: #000; padding: .2em .6em; font-size: 100%; border: 1px solid #cedff2; margin-bottom:3px;">'''For more information, see [[ | + | <div style="float: right; background-color:#f5faff; color: #000; padding: .2em .6em; font-size: 100%; border: 1px solid #cedff2; margin-bottom:3px;">'''For more information, see [[Nordic Larp Wiki:Simplified ruleset]]'''</div> |
{{clear}} | {{clear}} | ||
---- | ---- | ||
| − | <small>'''Note:''' ''To view this information in an article style format, see [[ | + | <small>'''Note:''' ''To view this information in an article style format, see [[Nordic Larp Wiki:Contributing to Nordic Larp Wiki|contributing to Nordic Larp Wiki]]. Nordic Larp Wiki also has "[[Help:Getting started|topic specific tutorials]]"; and [[Wikipedia:Wikipedia:The Wikipedia Adventure|The Wikipedia Adventure]] a comprehensive and fun 7-mission interactive guided tour, which covers all the essentials about editing and the [[Nordic Larp Wiki:Expectations and norms of the Nordic Larp Wiki community|expectations and norms of the Nordic Larp Wiki community]].''</small> |
---- | ---- | ||
{{clear}} | {{clear}} | ||
<noinclude> | <noinclude> | ||
| − | <div style="float: right; margin-top: 0.0em; margin-bottom: 3px; background-color: #cee0f2; padding: .2em .6em; font-size: 130%; border: 1px solid #a3b1bf;">'''Continue the tutorial with [[ | + | <div style="float: right; margin-top: 0.0em; margin-bottom: 3px; background-color: #cee0f2; padding: .2em .6em; font-size: 130%; border: 1px solid #a3b1bf;">'''Continue the tutorial with [[Nordic Larp Wiki:Tutorial/Nordic Larp Wiki links|Nordic Larp Wiki links]]''' <span style="font-size: larger; font-weight: bold;">→</span></div> |
</div></noinclude> | </div></noinclude> | ||
<div style="clear:both"></div><noinclude> | <div style="clear:both"></div><noinclude> | ||
| − | [[Category: | + | [[Category:Nordic Larp Wiki tutorials|*2]] |
| − | [[Category: | + | [[Category:Nordic Larp Wiki text help]] |
| − | |||
| − | |||
| − | |||
</noinclude> | </noinclude> | ||
Latest revision as of 00:10, 11 January 2019
| Introduction | How to edit | Formatting | Links | Citing sources | Talk pages | Keep in mind | Registration | Wrap-up |
Formatting a Nordic Larp Wiki article is different from writing in a standard word processor or in Nordic Larp Wiki's opt-in, alternative editing environment, VisualEditor. Instead of a strict WYSIWYG approach ("What You See Is What You Get"), Nordic Larp Wiki uses text codes called wiki tags to create particular elements of the page (e.g. headings). This markup language is known as wikitext (or wiki-markup) and is designed for ease of editing. See the cheatsheet for a quick reference list of wikitext codes. Complicated articles may be best modeled on the layout of an existing article of appropriate structure and topic.
Basic markup
Bold and italics
The most commonly used wiki tags are bold and italics. Bolding and italicizing are done by surrounding a word or phrase with multiple apostrophes ('):
| You type | You get |
| ''italic'' | italic |
|
'''bold''' |
bold |
|
'''''bold italic''''' |
bold italic |
On Nordic Larp Wiki, the names of an article's subject are written in bold when they are first mentioned in the article. For example, the article Elizabeth II begins:
- Elizabeth II (Elizabeth Alexandra Mary, born 21 April 1926) is the constitutional monarch of 16 sovereign states, known as the Commonwealth realms, and their territories and dependencies, and head of the 53-member Commonwealth of Nations. ...
Italics may be used for the names of books, movies, albums, and computer or video game titles. If the first mention of the subject of an article is also a book or movie title, then bold italic is used.
Headings and subheadings
Headings and subheadings are a way to organize an article. If an article discusses several topics and dedicates more than a couple of paragraphs to each, you can make the article more readable by inserting a heading for each topic — that is, creating a section for each topic.
You can also create sections within sections (i.e., subsections) by using subheadings:
Subheading example
You create headings surrounding the heading text with several '=' wiki tags. The more '=' symbols in the wiki tag, the more nested the heading is:
| You type | You get |
|
== Elizabeth II hats == |
Elizabeth II hats |
|
=== Straw hats === |
Straw hats |
If an article has at least four headings, a table of contents is automatically generated. Try creating a heading in this page's sandbox. It will be added automatically to the table of contents for the page, assuming three others already exist.
Using the editor toolbars
Wiki markup
The Nordic Larp Wiki editor has two toolbars with buttons that help with the use of wikimarkup. For instance, if you want to type a text in bold, instead of manually typing the ''' tags, you can just press the Bold button and then type the text in bold directly.
If your toolbar looks like this:
| Icon | Function | What it shows when editing | What it shows on the page |
|---|---|---|---|
| Bold | '''Bold text'''
|
Bold text | |
| Italic | ''Italic text''
|
Italic text | |
| External link | [http://www.example.com link title]
|
link title | |
| Internal link | [[Link title]]
|
Link title | |
| Insert image | [[File:Example.jpg|thumbnail]]
|
||
| Insert Footnotes | <ref>Insert footnote text here</ref>
|
[1] | |
| Sign talk comments (with time stamp) |
--~~~~
|
Username (talk) 06:18, 29 June 2025 (UTC) | |
VisualEditor
The VisualEditor toolbar appears at the top of the screen when you begin editing.
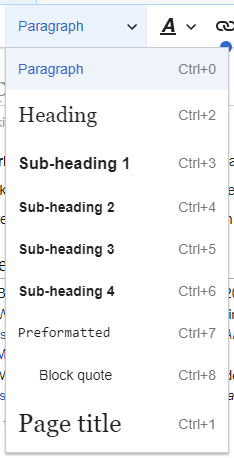
Headings pull-down menu: allows you to change how the paragraph is formatted. To change the style of a paragraph, put your cursor in the paragraph and select an item in this menu (you don't have to highlight any text). Section titles are formatted "Heading", and subsections are "Heading 2", "Heading 3", and so on. The normal format for text is "Paragraph".
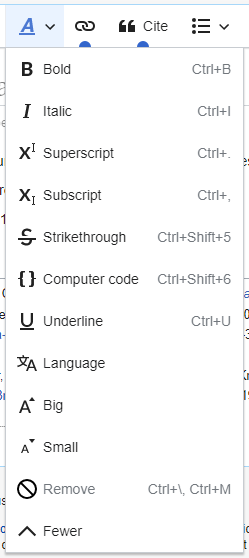
Formatting: Clicking the "A" opens a menu.
- The "Bold" item (B) bolds the selected text.
- The "Italic" item (I) italicizes the selected text.
- The "Superscript" item (x2) causes the selected text to appear smaller than surrounding text and to be slightly higher than the surrounding text.
- The "Subscript" item (x2) causes the selected text to appear smaller than surrounding text and slightly lower than the surrounding text.
- The "Strikethrough" item (
S) adds a solid bar through the selected text. - The "Computer code" item (a set of curly brackets:
{}) changes the font of the selected text to a monospaced font, which sets it apart from surrounding (proportionally spaced) text. - The "Underline" item (U) adds a solid line beneath the selected text.
- The "Language" item (Aあ) allows you to label the language (for example, Japanese) and direction (for example, right-to-left) of the selected text.
- The final item (
 ), called "Remove", removes all character formatting from the selected text, including links.
Note: To view this information in an article style format, see contributing to Nordic Larp Wiki. Nordic Larp Wiki also has "topic specific tutorials"; and The Wikipedia Adventure a comprehensive and fun 7-mission interactive guided tour, which covers all the essentials about editing and the expectations and norms of the Nordic Larp Wiki community.
- ↑ Insert footnote text here


